Monday, October 31, 2011

Making and Pressure Canning Tomatillo Salsa

 
Some dear friends gave me a bag of tomatillos that they grew in their garden.  I knew I loved green sauce but had never made it.
Tomatillos come with a husk that is easy to peel away.

Peeling the husk then soaking in water helps remove the sticky residue that covers the tomatillos.

The husk isn't hard to pull off.

It looks like a green tomato.

The beginning of the sink full of soaking tomatillos.
I roasted them in the oven and froze them (after cooling), till I had some time to make the salsa..
I did make one batch of the salsa and made the best chicken enchiladas I’ve ever eaten. That encouraged me to make the rest into salsa. My friends were so happy that I used them, and didn’t let them go to waste, that they gave me another bag! Now I knew I had a serious batch of salsa to do. So I roasted them as well, and after cooling, froze them. This past Saturday I pulled out all the tomatillos, thawed them and made some yummy salsa.
A full pot of salsa, simmering.
The food processor worked great to blend the salsa to a nice texture.
I used it to chop all the vegetables as well. 
A very full bowl of salsa ready to go into my hot jars. (Sterilized in the oven for 20 min at 250)
 The 23 Qt pressure canner ready to work. It fit all 14 jars. It's ok to stack jars in this tall canner. I'm ordering another metal plate to make stacking easier next year.

Beautiful Tomatillo Salsa Verde cooling. You can see some of the Tattler Re-useable canning lids in front.

 I looked at several recipes, and then decided to put my own recipe together. Making the most of what I had without a trip to the store, helped form this recipe. I’ll include it here but keep in mind that you can play with the recipe to suit your tastes.

Here is the first recipe I used. It turned out really yummy.

Here is the recipe I used for Pressure Canning.

Tomatillo Salsa Verde

      20 c. of tomatillos, roasted
      2 c. mild peppers, (red, orange and yellow) chopped
      2 hatch chilies, chopped
6 c. onions, chopped
2 c. lemon and lime juice
      24 cloves garlic
      4 T cumin
      4 T oregano
      4 T salt
      4 T black pepper
      4 T cilantro

Combine all ingredients in large pot. Cook over low-med heat. It scorches easily so I used a lower heat. Simmer for 20 min.Use a blender or food processor to blend the salsa in batches. I used a food processor so I could achieve the texture I was looking for. I wanted some chunks but not a puree, like the blender might have given me.
Ladle into hot jars, leaving ½ “ head space. Wipe jar rims with a clean cloth dipped in boiling water. Put lids on tight then loosen a small amount, 1/4” (for air to escape during processing). Use the recommended amount of water for your canner.  Process in your canner for 20 min at 15 lbs of pressure. (Everything I’ve canned gets 15 lbs of pressure because we live above 5000 ft.)
Please check your canner book for processing changes, for your altitude.

This recipe yielded 14 pints of salsa.

I've started searching for recipes and ideas for using all this salsa. As a result I think you should experiment! It's good on any meat and gives a hot dog some zing! Yes, we tried this last night. After watching some cooking shows my husband got inspired and suggested we put it and some raw onions on our hot dogs. I was skeptical, but it was really good! Try it in an omelet or as a quick sauce for anything!

I wanted to make a note about the re-useable canning lids I tried this year. The Tattler Canning Lids have been a great investment. They sealed with no problems. I love that I won't have to spend money every year on new lids.  I bought 3 dozen, wide mouth lids to start with. I wanted to try them out before buying all I need. I'm sold. I'll be making a sizable purchase to cover our needs. Here is a link if you haven't heard about these.  http://www.reusablecanninglids.com/

I have more tomatoes to can so I'm not done yet. We picked everything in the garden before it froze. We have had our dining room table taken over with ripening tomatoes for a while now. As they ripen I do another batch of sauce. I'm ready to be done. Tired girl walking.

Tuesday, October 11, 2011

Home Canning in America


  While I was growing up we always had a large garden. For a family of 6 this was a way to provide our family with healthy food at a very small cost. The cost being, new canning lids and our efforts. We had a supply of jars already. I am the oldest of 4 children so I learned early, at the knee of my mother, how to "put up food". She and my Dad came from farm and ranch people who knew how to preserve food in many ways. The goal of the summer and fall was to raise enough produce for a year’s supply, until harvest time the following year.
  In the fall we knew we'd be busy canning and freezing all our produce. Whole days were dedicated to canning fruit and vegetables. If we had a large harvest we would can and freeze for days in a row. I can still see all 4 of us kids at the kitchen table, each with a duty. Mom would keep us on task, demonstrating how to do each action, and man the water bath. We all worked hard. The younger ones peeled off as they wore out. Leaving my mom and I to do the last of it. I loved working side by side with her. She knew so much and I wanted to learn everything.
  I've learned a lot from her. She inspired me to do the same for my family. I've also learned from the many books I own. The Internet has been invaluable to me as well. I've learned so much in the last few years. I've picked up so many skills, really useful skills just by watching videos and reading about what other people have done.
  My parents were raised to also have meat in the freezer. I remember many summers, getting a half beef delivered. It filled up our chest freezer and lasted a long time. My mom loved the thought of only having to buy milk, bread and eggs all winter.
  I remember the year my dad planted Jerusalem artichokes. None of us really liked them. You eat the bulb, which is miss-shaped and hard to peel. They don't have much taste. They kind of took over that garden. Thank goodness dad made a separate garden for them. Every year they would come back even though we didn't want them anymore. We sold that place about 30 years ago. I'll bet there are still some that come up there. Stubborn buggers.
  Dad and mom put in berry vines one year. We got some great jam from them. I still love berry jam and try to make it when I can find cheap berries. Any kind of berries will do.
When I lived in CA we had blackberry and raspberry vines. I used to make a triple berry jam that was to die for. Strawberry, blackberry and black raspberry, OMG it was so good! I've never come close to that jam since then. It was absolutely the best jam I've ever tasted. I lived in Ca for 30 years. Raised my kids to be gardeners just like their mama.
  I've always tried to have a garden as a grown up type person. I'm 51 now so that's a lot of gardens under my belt. When my kids were tiny I started my first compost pile. I simply dug down about 2 ft in a flowerbed in a corner where nothing was growing. I layered my kitchen scraps with dirt from the hole and leaves. It took a few months to fill it up.  I kept moving down the flowerbed, digging the new hole right next to the old one. I left it alone, no turning, no effort and in a year I had black compost to use in my potted plants. It was a shady backyard so no garden there. But the next house we had a great garden. The kids got their own row to tend and loved it. It was their choice to grow what they wanted. Kids tend to want to eat veggie’s they grow themselves, so it's a win-win situation. Now my kids are grown up but don't have kids of their own yet.
Fortunately, my new husband has 2 kids just like me. Kym is his oldest and just had a baby girl 4 months ago and we're very excited to be grandparents. We're very actively involved with babysitting and many trips to bring food the first 3 months. Now we have a granddaughter to spoil, and we are doing just that! I can hardly wait to buy her her first set of child size tools. She has already come out to the garden with grandma to water.
Good times ahead!

Monday, October 10, 2011

Canning Season is Almost Over


   I thought I'd share what I’ve been keeping so busy doing the past couple of months. I've been canning! For the 2 of us I don't need hoards of food, however it does give me great pleasure to see all these canned goods. We know they're organic and safe to eat.
 
   I made and canned pasta sauce, tomato sauce and chili. Also canned green beans, peaches, chicken soup and chicken stock. I've also been doing lots of freezing. Strawberries, peaches, pineapple, cherries, grapes, bell peppers, broccoli and anything else that's on sale at a good price.


   This past weekend I canned 9 quarts of chicken soup and 10 pints, and a couple pints of broth. It took 3 batches in the pressure canner. Bob got in on the fun and helped chop vege's. We always have fun cooking together. It will be nice to pull out a jar and heat it up after shoveling snow or anytime for that matter.

I got this cabinet from a friend for free. I put it in the craft room and have filled it with canned goods as well as cereal and a few other foods.

  We should have enough chicken soup to last through the cold and flu season. This batch is mild compared to the the "Get Well Soup" that I make for sickie's. It has a lot of onion and garlic as well as herbs to help them get well.


   We ate a jar of peaches last night with our dinner. It was such a sweet treat. After all that canning it felt well deserved. We can eat 1 can every 3 weeks and they'll last till next peach season.  The tomato products should last most of the coming year. My goal was much more for tomatoes but I didn't get the volume I was hoping for. One drawback of crowding plants, it lowers production.
   We got enough to keep me very busy so I'm happy. I did a batch of tomatoes a week until the last 3 weeks when I had to do 2 per week.


   More updates on the garden to come.

Friday, September 16, 2011

The Gate for Kym


  I made a gate for Kym to enclose her porch. I made it with all recycled wood. It's not perfect but it serves the purpose. Not bad for my first gate.


Here it is at home before I hung it. I put a Poly finish on it to protect it from our harsh winters.


Tuesday, August 23, 2011

I Canned Peaches

Don't they look pretty in the sun?
I canned a lug of peaches and got 18 pints.(I gave
 one away.) A lug is 22 lbs of fruit, in a box.

These peaches are from the north slope area in Colorado.   
Some weren't ripe so they will be eaten
and frozen for smoothies.

 Peaches before they got canned. The green bowl is water with lemon juice in it. I didn't have any Fruit Fresh and I've found lemon juice
works just as well as a substitute.

Here is my new pressure cooker. It worked well canning the peaches. I read and reread the directions before using it.


We're looking forward  to yummy fresh tasting peaches till this time next year.

Happy Canning Everyone!

If any of you are preserving food, send me a photo and I'll post it!


Monday, August 8, 2011

Hypertufa Drying Rack

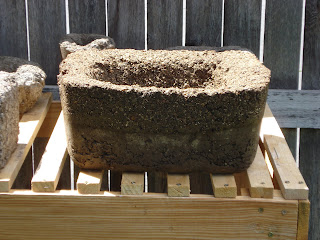
  I needed a place to dry the tufa containers that was sturdy and out of the way. Once again I turned to my free wood and got busy making this rack. It didn't take long to make, just a couple hours. It's against the fence so it's out of the way and very sturdy.

I've made a few new pieces, a window box and several large bowls. I colored the cement brown but I think this got soaked off in part of the curing process. I've learned to soak new pieces for several days and then let them air dry for a couple weeks. Apparently not the stained pieces, I’ll have to hose them off daily.


This bowl was made with 2 different batches. You can see the stripe of the darker color at the top. I just pulled this one out of the water today. It'll be interesting to see what it looks like when it's dry.

I've been doing exciting projects. Made a gate, my first. It turned out ok I think. More on that after I hang it.
Bob, my husband, and I made a Solar Box Cooker.  We're now in the midst of working out the details. I redesigned it a bit today and will finish tomorrow, so more on that to come as well!

It' Time to Freeze Sweet Bell Peppers


  Sweet, Bell Peppers were on sale at our local King Soopers last week. I bought 8 of each color and froze most of them. I washed them up, sliced them and put them in Ziploc bags. One pepper of each color, (red yellow and orange) in each bag is just enough for a meal for us. 
We eat them in fajitas and I cut them up further for pasta sauce. I did cube one bag for other recipes. One of our favorite ways to use these peppers is to make shish kabobs. We add chicken, cherry tomatoes, mushrooms, onion and pineapple pieces to these already colorful peppers. We feel healthy when we eat this!
  I used the new Ziploc bags that come with a little pump/vacuum. The pump fits over a circle on the bag and sucks the air out. They work great! The plastic seems to be stronger and more suitable for freezing. What I like most about them is that they keep the seal. Other bags I’ve used don’t hold the seal, letting unwanted air into the bag causing freezer burn and unpleasant tastes. These new bags state they are for one use only but I’ve reused them and they’re holding up fine. Still holding a seal.
   These new bags are more expensive than store brand freezer bags. I’ll be using some of them this fall. If they could offer 50 of them for a cheaper price I would use them exclusively. That’s how much I like them.
 
Strawberries from the freezer and still has a seal.
Broccoli from the freezer. Still holding it's seal.
I’ve taken a couple photos of other produce I’ve frozen in these new bags. Out of the freezer and they still have a good seal! Finally a good freezer bag!

Tuesday, July 19, 2011

The Garden is Growing!


It's a jungle out there! I'll have trouble getting through the rows of tomatoes soon. I'm not complaining. I knew it would be this way when I planted all those tomatoes. It's ok. I over crowd all my veggies. I still get lots of produce and I don't have as much weeding to do. I have two small plots out there so I make the most of the space I have by going vertical along the fence. The tomatoes will be tied to the wire fencing when they've grown too tall for the cages they are in, which will be next week at this rate. I used more apple branches to stake all the tomatoes down the middle. They are loaded with blooms and fruit.


The green beans have reached the top of the fence.
The onions are still blooming and buzzing with bees.


The squash are creeping over the eggplant. I'll have to tie them up again. I'm trying to train them to go up the trellis. I tied them to the trellis last week. They resisted. I've tried this in past years with no luck, but I'm determined to try again.


 The wall of strawberries has really filled in.
It's a nice privacy screen and such fun to see all those berries hanging there for us to admire while we sit outside.

  Here is trellis type support I made for a planter. I have tomato and sunflowers in it. Sunflowers will keep other plants around it reaching their potential, but I have so many tomato plants this  year, I don't mind if this one is stunted a bit. It's nice to step out onto to patio and pick tomatoes.

This type of trellis is really easy to make. Pick desired      branches and poke them into the pot with even spacing. Gather at the top and fasten with wire. This one also has wire running around it spiraling to the top. It helps support the branches. 
Happy gardening!

Thursday, July 14, 2011

The Hypertufa Containers are Curing

I've had good results with yesterday's batches of Hypertufa. Here are most of the containers so far. Several different batches represented here. On the table are some nice big pots, some pavers (I used meat trays, oiled) for my garden, also some watering rocks for my potted plants. Since I have a small garden I don't have room for big stepping stones.


Lots of tufa curing on 1x2's on a table. I read that it's good to let it rain on them to leach out the Lyme. Some people spray them with vinegar to neutralize them. Since we're getting rain showers every day, I thought I'd set them up outside to let nature do its thing. If you don't have rain it's recommended to soak them with the hose every day or submerse them in water, soaking for at least 3 days.
They need to dry for a couple weeks after that. Longer for bigger objects.


  I set up a tray on the grass to hold more of yesterday's treasures. I like the way the baby planters came out. The sphere should be fun to put together. One has a line around one end where it was sitting on top of the pot. I can fix that with a slurry.
   It looks like I may have to build a drying rack. I could put it along the fence so it would be out of the way, since they have to dry for so long.


  Here is the fountain with all the tiles laid in it. I'll grout it when it's dry. I like it. I haven't quite finished this. Needs some fill in here and there.


 A simple dish tub and the containers strawberries come in are the two types of molds seen here. I used a dowel to make drainage holes when I formed these yesterday.
  They came out of the molds easily. Once again I used cheap motor oil painted on with a sponge brush. It's important to wash the molds right away. I'll scuff these tufa planters up a bit with a plastic brush.

  I think I'm ready to make the frame for some window boxes. These will sit on a 7" railing. It's a gift for my step-daughter for her birthday. I had to make sure I had the recipe right before I took on a large project like that.

  I read yesterday that these pots are perfect for African Violets and Bonsai. I have a couple African Violets in my kitchen windowsill that need new containers. It'll be fun to choose a couple when they're dry.

 
I like how they came out.


Wednesday, July 13, 2011

It's Tufa Time!

Hypertufa is a light weight concrete mix that gives you a container with the strength of concrete but light weight. The basic mix is Portland cement, perlite and peat moss.

  I've been trying my hand at making hypertufa containers. Some turned out, some did not.( I didn't wait long enough to remove them from the mold.) I was able to crumble the remains of the disasters and used in a 'save the crumbles batch'.
  That turned out ok, as all of the containers are solid. It was not a true tufa recipe, as I didn't have the perlite. Basically I mixed equal parts of peat, sand and cement.
I should have let all of them cure for two days instead of one.
  A lot of research was done before I bought those first few bags of cement. There is a wealth of information out there for beginners like me. I watched lots of videos, studied recipes and techniques. I did take precautions like wearing goggles and a face mask when dealing with cement. I'm working in the garage with a fan, on a stand, placed behind the work area blowing outside. Once the recipe is mixed and the fan has cleared the air, I
remove the mask. It's been hot and humid lately so getting that mask off as soon as it's safe is very important to me!  I went shopping and got more peat, perlite and containers to use as molds, (I got these containers at Big Lots.) and made several batches yesterday.
  I'm attempting a large fountain using our fire pit as a mold (lined with plastic trash bags).
I'll let that one cure a couple days before I attempt to remove the mold. I made a bunch of tiny planters for cactus or mini plants as well as some medium sized bowls as well. I'll remove them from the molds and scuff them up a bit with a brush to make them look more like stone. You can see the tiles I've broken to go into the fountain once it cures. I wore eye protection and put the tiles in a plastic grocery bag while breaking them. Gloves are a good idea as the tile pieces can be very sharp.
Fire pit as a mold for fountain.
     The tiles were free! Given to me by a craft-hoarding friend like me. She and I have become great 'pickers' utilizing craigslist and freecycle on a daily basis. Both sites are free and very useful. Craigslist is like an online newspaper you visit. It's part of my routine to check it every morning. Freecycle is a site that you have to join, then you get sent daily emails. It's free to join and I have gotten some items from members of my group. You can ask for what you want and people seem to come up with that item. It's very cool, ask and you shall receive, right!? It's a great way of getting what you need
for very little or no money.
  We should talk about molds. You can use almost anything for molds. Plastic containers work best.You do have to coat the inside with a release of some sort. You can use cheap, new motor oil or Armor-All spray (for cars). No vegetable oils as they can go rancid. Cardboard boxes can work when covered with plastic. Wood frames can be made and covered with plastic.

  Here's a fun website that can give you some ideas.  The Artistic Garden
 Here's one that gave me inspiration!  Little and Lewis

 Here I cut a basketball in half, oiled it, filled it and set dowels to create a tube when mortared together. This will be part of a fountain.
 I made a shallow dish with left over mix. You can  use the inside of the bowl or...

 You can turn a bowl or planter upside down and cover it with mix.
  Here's variety of containers that can be used. I went through the house scavenging! A cheap disk toy will be a level on a fountain. The yellow bowl has a concave on the bottom so I can set a sphere on it! The plastic drinking glasses are little planters. The triangular one has two uses, the small part will be a leg for a big pot and the larger one a leg also although I made planters from some of them.
Now to go out and see how it turned out! How fun!
Time to scuff them up!